
This blogpost I will be giving a quick look into our 3D pipeline for Flotsam by through the process of making the desalinator!
I originally started showing this process in a twitter thread, if you prefer a more bullet-point approach.. check it out here.
Concepting
When sketching out a building concept for Flotsam we keep a few things in mind. Gameplay being the most important among them. As well as: how to visually portray it’s function and whether the game engine can handle it.
For gameplay, it was quite simple. A player can set an amount of fresh water to be created and picks the type of fuel. Drifters assigned to desalination should then grab the fuel from the storage, deliver it and process salt water at the Desalinator until it condensates into fresh water. Rinse and repeat.
Visually, we wanted to portray the most simple form of desalination.
A drifter funnels salt water to a boiler component. Fueling the fireplace or stove underneath heats up said boiler, evaporating the salt water, Separating the salt. The evaporated water then exits towards a container where it’s stored as fresh water.
With this in mind, Stan made some excellent concept sketches.
Here’s what I started working with:

Blockout
With the concept next to me, I usually start out by blocking the shapes using simple geometry. Popping some spheres, cylinders and cubes in there. as well as throwing in a drifter-base mesh to use as scale reference. After an extremely basic shape setup, I add another cube, scale it to the size of the suggested/requested in-game boundaries and only render the edges. Then freeze it. This will act as a cage when modelling the rest and force me to model high instead of wide. (or vice versa, when necessary)
Continuing on the basic shapes, I start blocking out more and more details. Carefully crafting the whole mesh instead of focusing on singular pieces. Always keeping the bigger picture in mind. Eventually creating this:

Texturing
I do a quick unwrap in 3D coat. Any polygon that would be completely black in the texture can be scaled down to a minimum and thrown on top of each other to save space. When it’s done, I throw on a paper texture and check for seams or scaling issues by giving it a spin.

Before adding any color, we paint the lines. This is a tedious and long process. We’ve researched and tested a few ways to speed this up, but all resulted in loss of control and bad lines. We usually paint them with a dark blue, however this can vary depending on what color lies underneath. (Red surfaces occasionally have dark red lines)
A general rule of thumb we uphold is to keep our distance when painting the lines. Getting up close can easily make you dwindle in details and forget the bigger picture. Painting with minimal amount of detail is usually the best, as intricate details can easily be added in the end, when the model allows it. We hardly ever get this right from the start, iteration is key. Thick lines and big dark shapes help. Not every edge needs a line, the idea is to balance it out for the player. Having lines everywhere would clutter more than anything.
It’s not easy to keep scale of every line equal. For instance a small character will have smaller lines than a huge whale. Whenever a possibility erupts we compare them to similar sized pieces in-game and adjust appropriately.
We’re quite used to the style we developed, however I’m unsure we’d use the same approach for our next game. It takes a painstakingly long amount of time to make something that looks and feels correct.

After the lines, we throw it in Unity. It’s easy to spot problematic spots of detail, as well as extremely thin lines or spots that can use patches of dark. We sponge it up into our brains and then we go back to the drawing board. Back and forth, back and forth, back and forth.

On to color!
It’s like painting, but in 3 dimensions. So we have to paint every side of it. Help.
While taking less time than lines, and being more relaxing in a way, it’s still a time sink. Some parts are kept pretty flat-shaded to keep details to a minimum. Going back and forth is crucial here too, as colors behave differently under lights.

Details
Some lines can’t be painted, as round objects don’t have edges to support it.
We use a pretty old-skool way of adding outlines to them. We duplicate the mesh, flip normals and drag the UVs to a dark part on the texture map. It’s used in older games to get similar effects. It can be done with a noisy outline shader (which kind of does the same anyway) but we only want the round objects to have it, which are integrated with other meshes to have a nice buildup effect when drifters are building these in-game. This method provides more control over the noise as well.

I didn’t remake planks, logs nor barrels as we already have these floating around in-game. I add these on to the Desalinator in Unity.
Lots of barrels make it quite chaotic, so it’s a challenge to keep it both logical and low on detail.

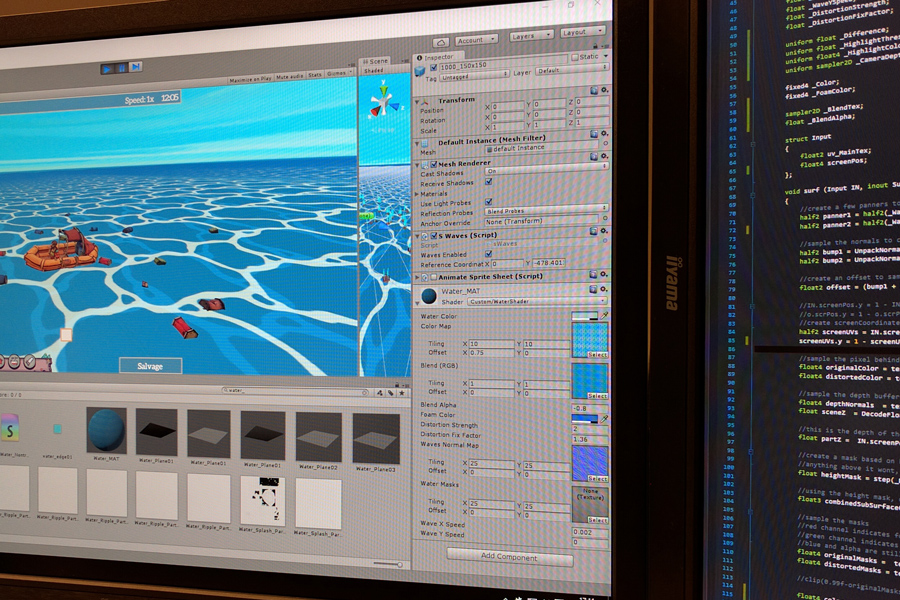
Here it is, all brought together in Unity with some (placeholder) particles thrown on there!
It’s not even near finished, but we used this version for a while to test animations, etc.. in-game before continuing.
That’s it for part 1! Next part I will go through adding the bike, steam and water particles, animating the Desalinator, and more!


Fabulous post, you have denoted out some fantastic points, I likewise think this s a very wonderful website